Bidding

---
The top area of the screen is the Play Area. This is where bidding, melding, and playing choices are made.
If it is your turn, then you will be able to tap the appropriate buttons or card images. The Play
Area will show you cards or choices made by other players. The bottom part of the Play Area will
tell you whose turn it is to play, and once a Trump has been named it will be shown there.
The contents of the Play Area will change based on which phase of the game you are in. In this example Sheila is starting the game by making the first bid. If other people had bidded before her, then their bids would be shown under their names (same row as the ??? indicating Sheila's turn). Sheila will look at her cards and decide whether or not she wanted to bid. She would then tap the appropriate button in the Play Area. The BID OR BUNCH button will only be visible if the Host has enabled that option and if all previous bidders have all tapped it as well. If all players tap the BID OR BUNCH button the cards will be redealt and bidding will start anew. If any player either bidded or passed then the cards would not be redealt, and each player that BIDDED OR BUNCHED would have a chance to either bid or pass. If Sheila tapped the PASS button then she is saying that she does not want to bid. In Auction style bidding (where the bidders continue to bid higher and higher) Sheila would be bypassed (a player can not PASS and then reenter the bid later). If Sheila wanted to bid higher then the options shown, she would tap the HIGHER button and would then see a new screen with higher choices.
Players can tap the Show/Hide Meld & Trick Values button at the bottom of the screen if they need to review the number of points associated with different melds and the points awarded for counter cards taken during tricks.
Here are some images showing the Play Area for other phases of the game.
Declaring Trump

---
Bill won the bid and is now ready to choose TRUMP. Bill is the only player who will see the 4 suit cards.
Whichever card he taps will become the TRUMP card for this round.
NOTE: If host has enabled the rule requiring a KQ in trump suit, then if the bid winner does not have a KQ in Trump suit after any partner/kitty pass, then they will have to FOLD and go set. Likewise, if host has enabled the rule requiring that the first trick played must be led with a trump, then if the bid winner does not have a trump card in their hand after any partner/kitty pass, they will have to FOLD and go set.
Passing cards
---
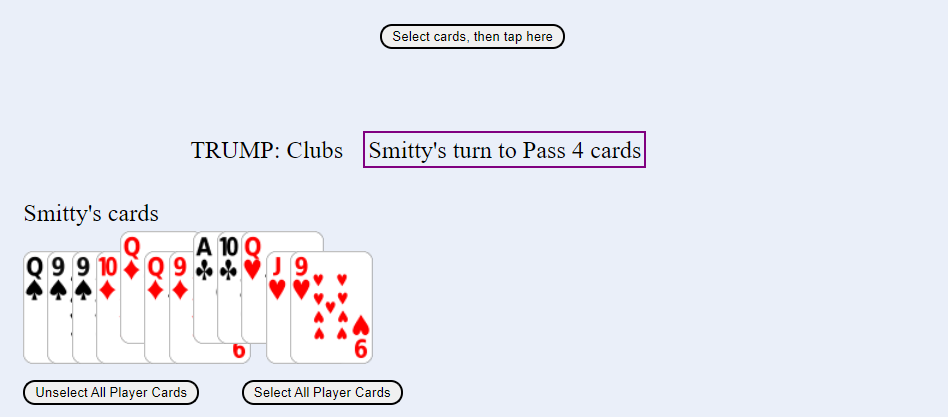
The host chose the game option to have the winning bid partners pass 4 cards to each other. Bill won the bid
and so his partner Smitty will pass 4 cards to Bill. In this example Bill chose CLUBS as trump as shown next to player information. Smitty has tapped the Ace and Ten of Clubs,
the Queen of Diamonds, and the Queenof Hearts. To complete the pass Smitty now needs to tap the SELECT CARDS
THEN TAP HERE button. (Note: If the host had not chosen to have any cards passed, then the game would immediately
continue with the MELD phase.)
---
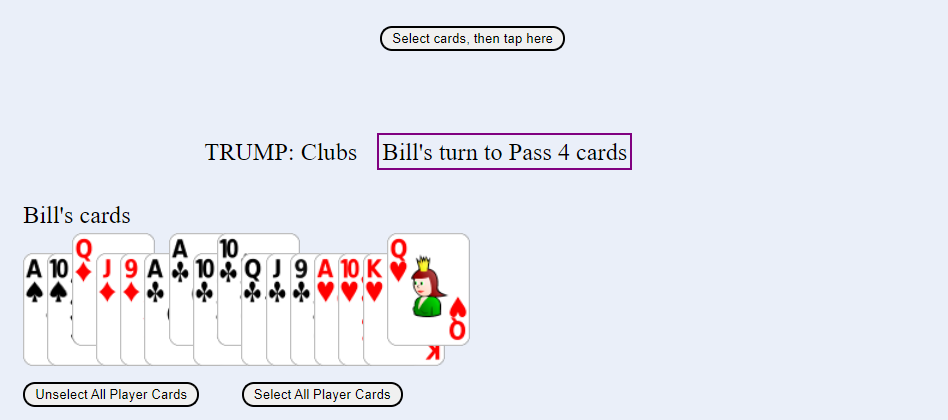
Bill sees the 4 cards that his partner passed him. They will
come in slightly elevated (selected) to make it easy for Bill to see which cards were passed to him.
To unselect them, Bill would either tap the UNSELECT ALL PLAYER CARDS button or he would tap each of the 4
selected cards individually.
---
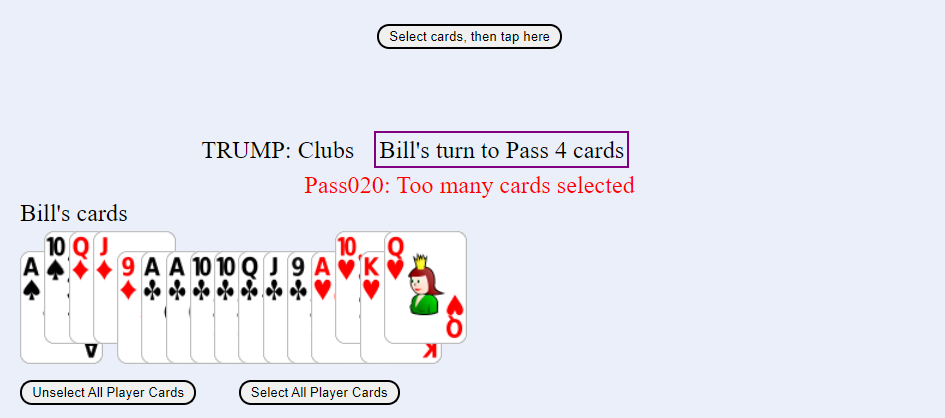
He would then tap the 4 cards that he wants to pass back to his partner.
Bill decided to pass back the 10 of Spades, Queen and Jack of Diamonds, and 10 of Hearts. To do this he will
tap each of those four cards and then tap the SELECT CARDS THEN TAP HERE button. If Bill selects too many or
to few cards and taps the pass button, he will see an error message. The error message will appear in red.
In this example Bill tapped the four cards he wanted, along with the Queen of Hearts. To correct this he would
tap the Queen of Hearts card to unselect it; and then he would tap the SELECT CARDS THEN TAP HERE button again.
Melding
---
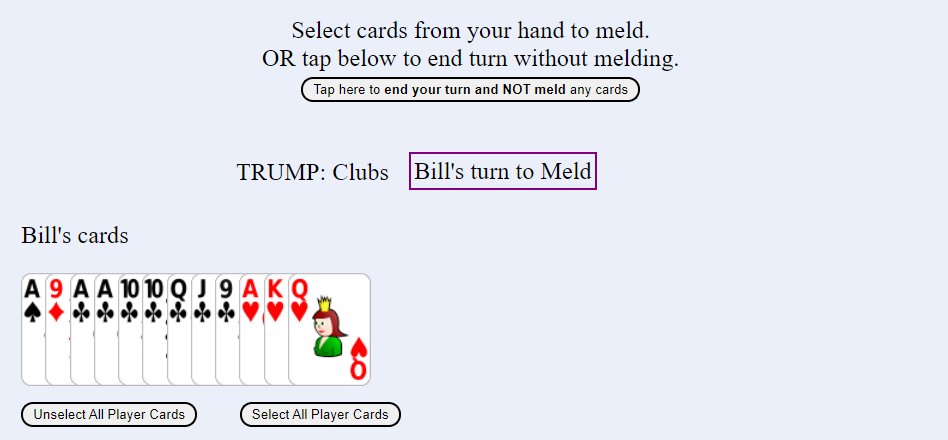
Players choose which cards (if any) that they want to meld. If no melds are available to them or if they don't
want to make any melds - then they can tap the TAP HERE TO END YOUR TURN AND NOT MELD ANY CARDS button. This button is only visible when the player has NO cards selected.
---
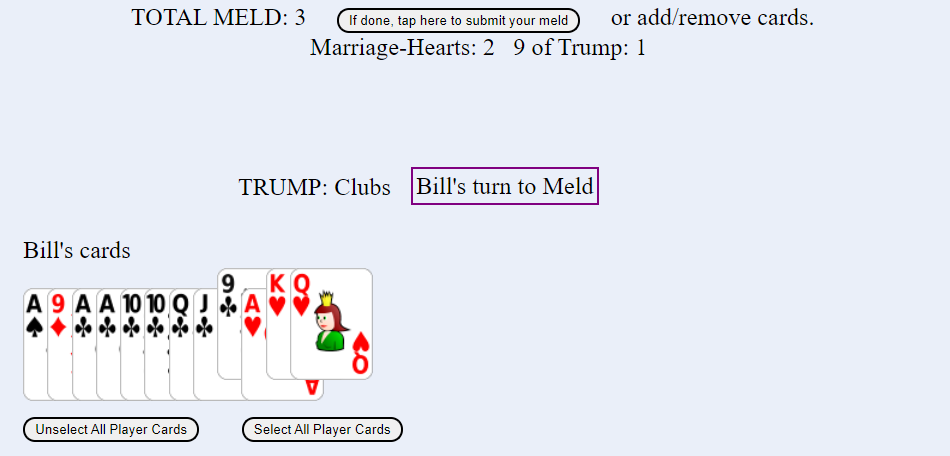
Players can choose which cards to meld. In this example Bill has tapped the King and Queen of Hearts and the
Nine of Clubs. Those cards are elevated and the resultant meld is shown at the top of the screen. If Bill
wants that to be his meld then he would now tap the IF DONE THEN TAP HERE TO SUBMIT YOUR MELD button. This would
then complete his meld turn. After all players have melded, then each player will be shown the cards melded by
all players (shown below). Bill can also unselect any of the cards and the resultant meld change will now be
shown to him. This method allows Bill to choose which melds he wants to show other players. If Bill unselected
the Nine of Clubs then he would no longer receive the extra meld point - but other players would now not know who
is holding that Nine of Clubs card.
---
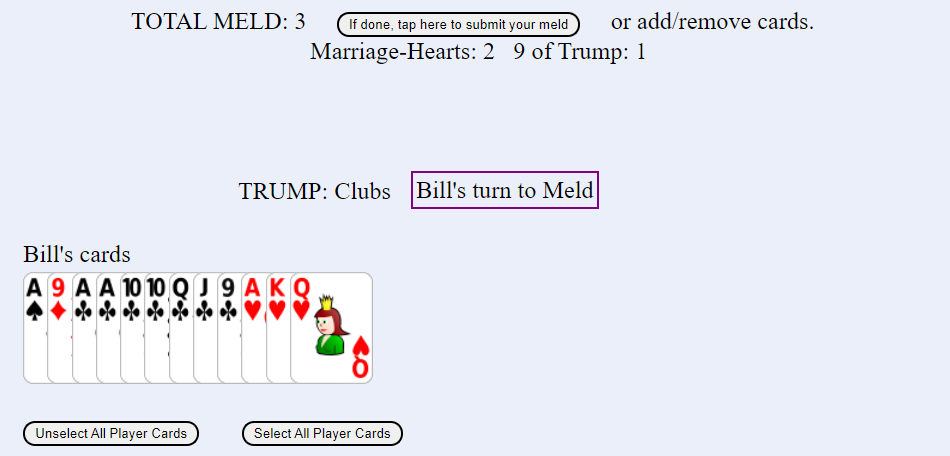
Players may tap the SELECT ALL CARDS button. The game will show them which melds their cards can make. They can
then tap the IF DONE THEN TAP HERE TO SUBMIT YOUR MELD button. Other players will NOT see all of that player's
cards - they will only see those cards that resulted in melds.
If player cards don't include any valid melds, then "No Meld" will be shown, and the player can tap the IF DONE, TAP HERE TO PASS WITH NO MELD button.
---
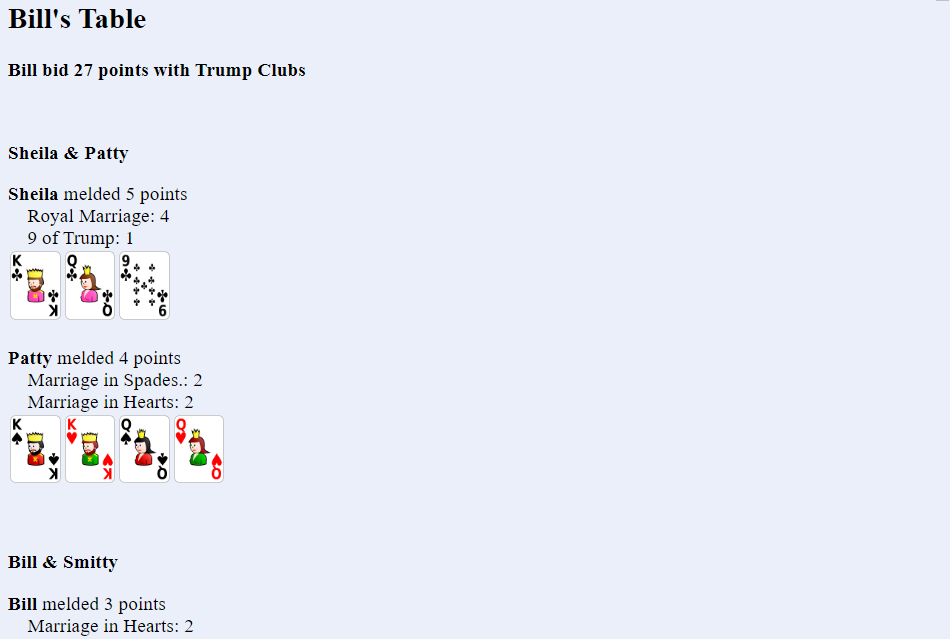
Not shown above is the rest of Bill and Smitty's team meld: Bill's Nine of Trump (1 point) and Smitty's meld of 4 points for a total of 7 points melded by Bill and Smitty.
---
After all players have melded, each player will view the melds that were made. When they are finished viewing
the melds they can tap the CONTINUE GAME button at the bottom of the viewing page. If any player has not yet
seen the melds page then a message will be displayed saying that not all players have seen the meld page yet.
The player would then tap the BACK TO VIEW MELDS PAGE button. Once all players have viewed the melds page, then
the CONTINUE GAME button will take the player back to the game where the bid winner will choose whether to fold,
play, or shoot the moon.
Deciding to Fold, Play, or Shoot the Moon
---
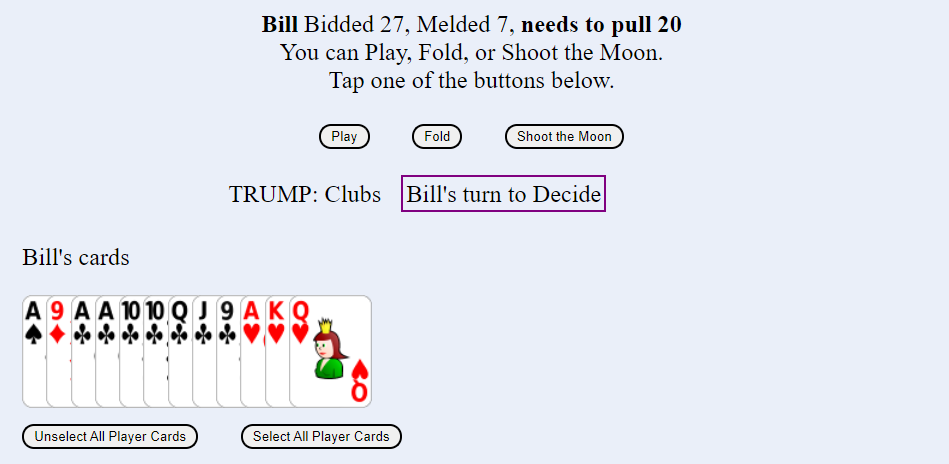
Bill took the bid at 27 points. He and his partner melded 7 points, so they now need to pull 20 points.
Bill needs to decide whether he will fold, play the game out, or attempt to shoot the moon (provided that the
host has enabled this option). Once he makes his decistion he simply needs to tap the appropriate button.
If Bill folds, then his team will forfeit their meld. Based on the option chosen by the host, either Bill's team will have the bid subtracted from their score or the other team will have the bid added to their score. Folding will end the round. No tricks will have been played, so the other team will not be able to gain additional points from counters taken during Trick play; but they will get to keep their meld points.
If Bill decides to play, then his team will need to take a minimum of 20 points (counters plus last trick bonus). If they don't, then they will go set. If they go set then they will lose their meld, and all points won from tricks as well. Based on the option chosen by the host, either Bill's team will have the bid subtracted from their score or the other team will have the bid added to their score. However, if Bill and his partner are able to make a minimum of 20 points, then they will keep their meld and the points from counter cards plus the bonus for last trick taken (if they won the last trick). In any case the other team will receive their normal points for meld and trick points (counters and possible last trick bonus) subject to the rule set by host which says whether a team must take at least one counter or trick to keep their meld.
If Bill decides to shoot the moon then he (not his partner) must take every trick. If he suceeds then his team will receive their meld, the points from counters and last trick, and will also receive a Bonus (set by host) as well. However if Bill does not take every trick himself, then his team loses their meld and their trick points. Based on the option chosen by the host, either Bill's team will have the bid and the Moon bonus subtracted from their score or the other team will have the bid and the Moon bonus added to their score. As always, the other team gets to keep their trick counters and meld subject to the rule set by host. Double jepordy for the bidder - so only choose to shoot the moon if your cards support it.
NOTE: There are two conditions where a bid winner is not allowed to play, but must fold. If the host has enabled either the rule requiring a KQ in trump suit or the rule requiring that a trump be led on the first trick, then if the bid winner can not meet that rule they must fold (and go set).
Bill decides to play it out. He taps the PLAY button.
Playing Tricks
---
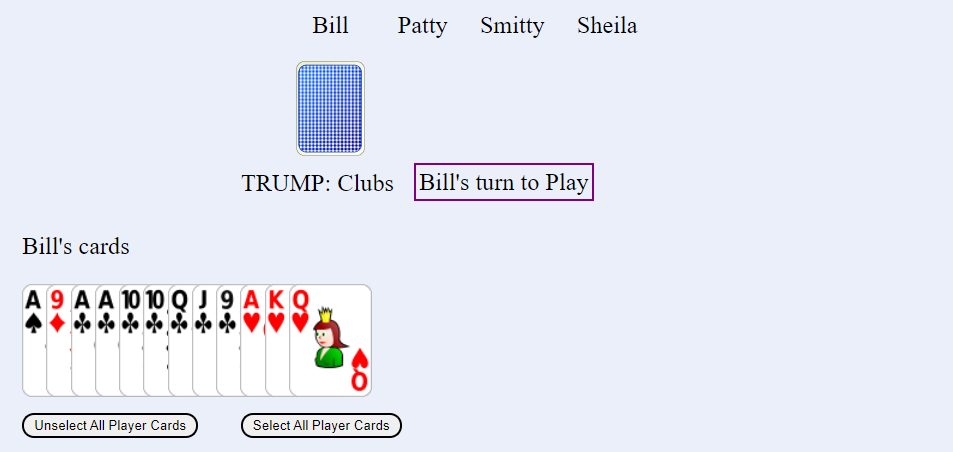
Because Bill won the bid, he will get to lead the first trick. He will tap one of his cards, and then tap the blue card under his name. Play will pass to the next player. The rules for which cards can be played are shown in the Game Info area (described below).
---
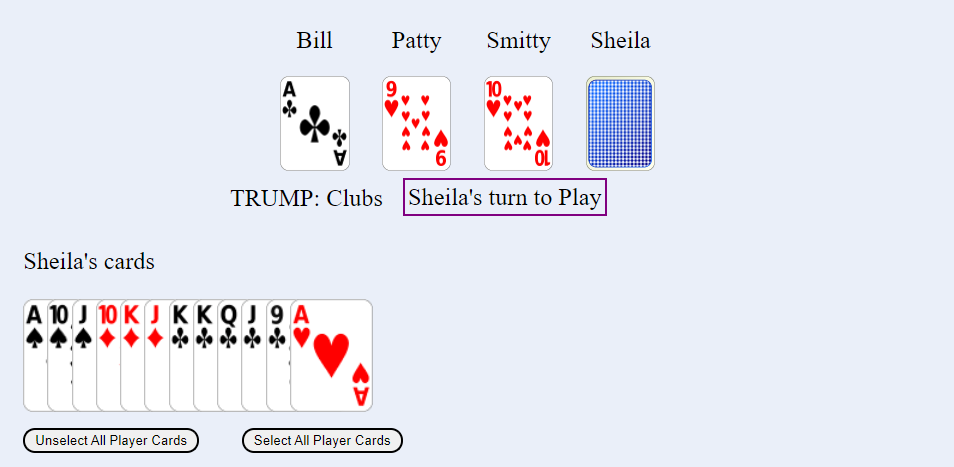
Bill led a Ace of Clubs. The person who plays the first card of each trick will always be shown first in
the list of names and cards played displayed at top of Play Area. Patty played a Nine of Hearts; and Smitty
played a Ten of Hearts. It is now Sheila's turn, and she will tap her Nine of Clubs and then tap the Blue card
under her name. After she does this everyone will see the Tricks Result page. If a player tries to play an invalid card they will see an error message.
---
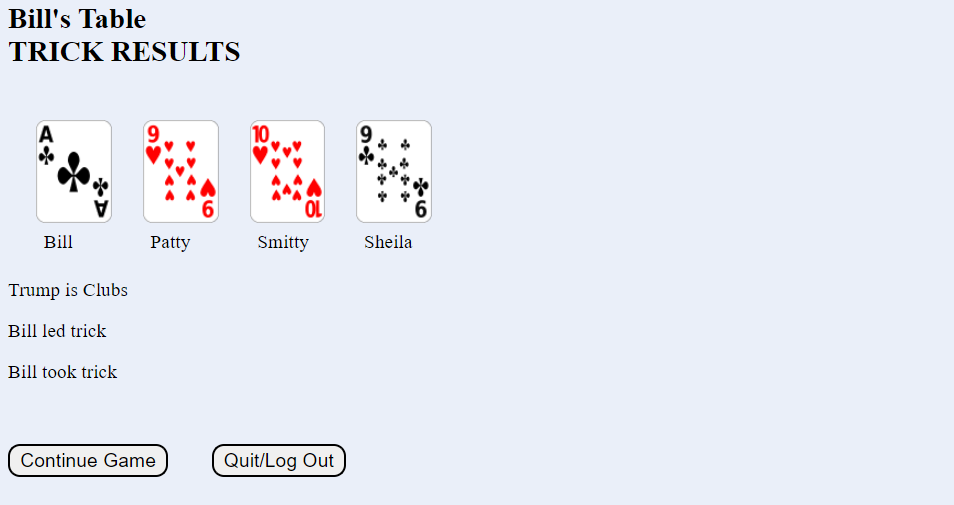
The results of this first trick are shown to all players. The cards played by each player are displayed, and the Trick winner is identified. The person who took the trick will lead the first card of the next trick. Like the View Melds page all players must have viewed the Tricks result before play can continue.
Scoring
---
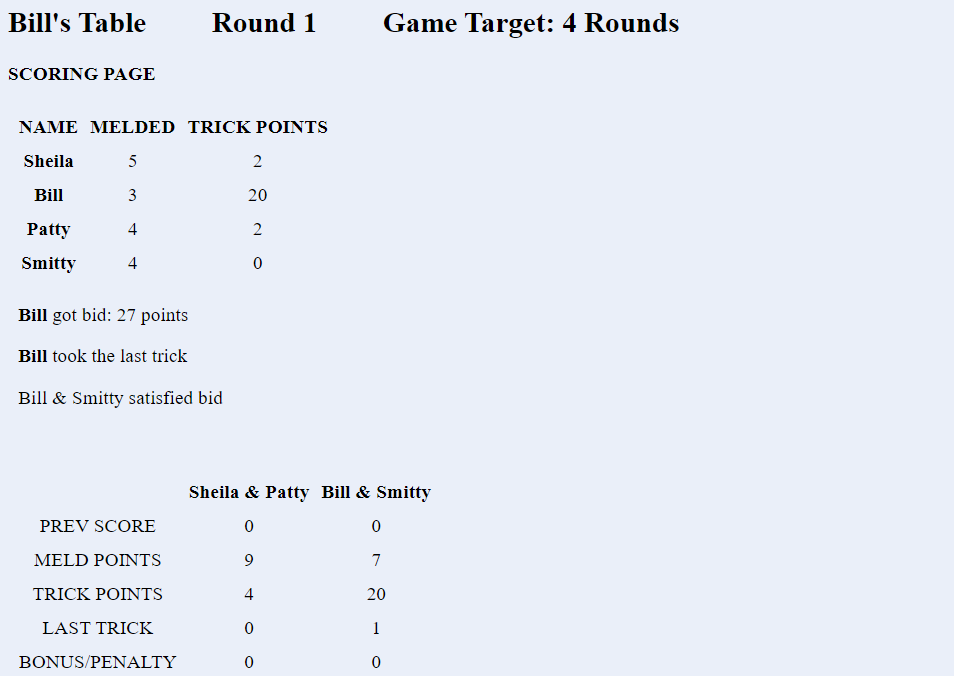
After the last trick has been played, players will see a scoring page. It will tell them the results of the round,
and will show them the new cumulative score. Bonuses and penalties will be displayed. If the game target has been reached then they will see a GAME OVER message. If the game target has not been met, then they will see a CONTINUE GAME button which will start the next
round. Like the Viewing Melds page, all players must have viewed the scoring page before the next round can start.
Player Cards Area

---
The Player's Cards area is right below the Play Area. Each player will see the cards in
their hand. Cards can be selected and unselected by tapping them individually. Selected cards
will be slightly elevated. Players can also select or unselect ALL cards at once by tapping the
appropriate button.
Game Information Area
---
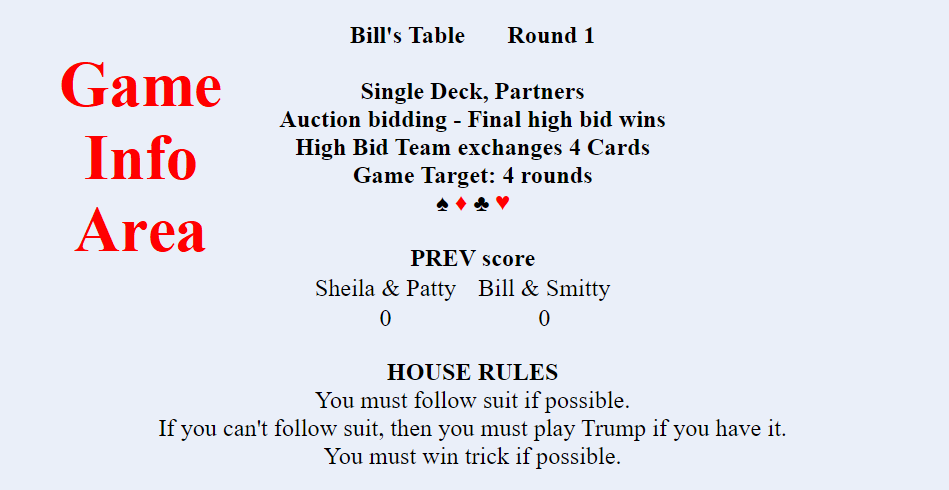
The Game Information area is right below the Player's Cards area. There is a lot of information
to be found here:
- Which round you are currently playing
- What the game target is (the game target can either be 1-9 rounds or a specific number of points that needs to be reached)
- Whether bidding will be a 1 time bid by each player or auction style bidding with the high bidder winning the bid
- Whether or not cards are being passed between the bid winning partners, or if playing individually whether or not cards have been dealt to a kitty that will be passed to the bid winner
- Accumulative Series scores from previous rounds will be shown here
- If bidding has completed the high bid winner and their bid will be shown
- If all players have melded then the number of points that the bid winner needs to pull will be shown here
- If playing tricks has started then the point values of counters taken in previous tricks will be shown here
- At the bottom of the Game Info area you will see the house rules for playing tricks.
These rules are set by the host, and include such things as
- Whether players must follow the suit led if possible
- Whether or not they must play trump if unable to follow suit
- Whether or not they must win the trick if possible
- If the Host has enabled the rule requiring a KQ to be preent in Trump suit, then that will also show in the house rules.
Help and Credits Area

---
The bottom section contains Help Information. These buttons can be used to access Help page, and the
Credits page. There is a button that will cause the Meld and Trick values to be displayed. Meld and Trick
values are assigned by the Host. There is also a Quit/Logout button. If a player quits or logs out they will
be taken to the Login screen. If all players need to quit for the day or simply take a break, they can all
quit/log out. Later they can log in again and the game will resume where it was left off (unless the Host has
started a new game).
If you haven't made a play in the last 10 minutes then the game will automatically log you off. You can log back in and you will see the current game status.